

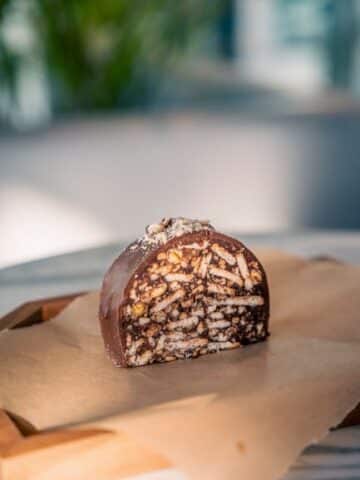
These No Bake Peanut Butter Bars are rich, creamy, chocolatey, and incredibly easy to make. With just a handful of pantry ingredients and no oven required, they're the perfect dessert for busy weeknights, summer days or whenever you're craving something sweet.
If you enjoy quick no-bake desserts, be sure to explore our collection of easy dessert recipes for more family-friendly treats.
It is the kind of dessert that gets compliments every time you make it. Moreover, it is hassle free to prepare because it can be ready within 20 minutes, uses the most simple ingredients, and doesn't require any oven.
The Day That Started It All!
Some things turn out to be a result of experiments rather than planning. This one right here is exactly the same kinda dessert.
During summer break it is really difficult to keep the kids entertained. One of our favorite activities to do is cooking. Or I'd say experimenting in the kitchen. So, one Saturday afternoon when kids wanted to do a kitchen activity, I instantly told myself to find something that can be made quickly. Because there was no way I was going to boil in front of the stove on a hot day.
That's when I found peanut butter, oats, powdered sugar and some chocolate chips in the pantry. That's how these no bake peanut butter bars easy enough to throw together in minutes were born in my kitchen. My kids loved these so much that they want to make them every other day now.
My kids also love these Peanut Butter and Chocolate Balls they're another easy no-bake treat that's perfect for family snack time.
The best part about this no bake dessert is that it doesn't require complicated procedure. No stand mixer, no candy thermometer, no specific mixing movements, nothing. Just a simple recipe to follow and these bars taste like Reese's peanut butter cup. Except that it is in a slab form and can be prepared in literally no time.
So, if you are a busy mama looking for a productive activity for your kids, this is your sign to make no bake peanut butter bars at home. Also, this is a perfect dessert for Muslim mamas looking for a quick halal dessert.
Why You'll Love These No Bake Peanut Butter Bars
The Taste: There is something magical about the combination of peanut butter and chocolate. The creamy and fudgy texture of peanut butter mixed with rich flavor of chocolate compliment each other perfectly.
The Ease: This dessert is the most simple one to make. With no requirement of having an oven, complex ingredients, and expensive equipment, you can prepare this mouth watering dessert just with a spatula, bowl and a few simple ingredients.
The Speed: This is the kind of dessert that you make when you're short on time. You can literally pull this off within 20 minutes of prepare time and then 2 hours of setting time in the freezer while you carry on your day.
The Forgiving Nature: The recipe of these no bake peanut butter bars is highly forgiving. Even if you replace some of the ingredients, it still works wonderfully. If your peanut butter has a little different consistency than the recipe, it will still turn out great. If you prefer milk chocolate over dark chocolate, you can use that without any hesitation.
Looking for another creamy no-bake dessert? Try our No Bake Oreo Cheesecake for an equally simple make-ahead treat.
Ingredient Tips: What to Look For and What to Swap
- Peanut butter: Use creamy, conventional peanut butter like Jif or Skippy for the best texture. Natural peanut butter can work but may make the base oilier if using natural, stir it very well first and consider adding an extra 2 tablespoons of powdered sugar.
- Oats: Old-fashioned rolled oats give a chewier texture. Quick oats work too and create a smoother, more uniform base. Either is halal and great here.
- Powdered sugar: Also called confectioners' sugar don't substitute granulated sugar here. The fine texture is what creates that classic bar consistency.
- Butter: Use unsalted butter so you can control the saltiness. Make sure it's melted and slightly cooled before mixing.
- Chocolate chips: Semi-sweet chocolate chips are classic, but milk chocolate or dark chocolate both work beautifully. Always check that your chocolate chips are halal-certified brands like Guittard and Enjoy Life are great options.
- Coconut oil: Just a small amount mixed with the chocolate makes the topping smoother and easier to cut. You can substitute with butter.
Quick Facts About This Dessert
- Prep Time: 20 minutes
- Setting Time: 2 hours
- Total Time: 2 hours 20 minutes
- Cuisine Type: American/ Halal Dessert
Tips To Make Perfect No Bake Peanut Butter Bars
Before heading on to the recipe, let's look at a few little tips will make your bars absolutely perfect every time.
- Line your baking dish with parchment paper before you start. Parchment paper helps in lifting the bars out really easy and smooth.
- Press the peanut butter base in firmly and evenly so it sets as one cohesive layer.
- Let the chocolate topping sit at room temperature for about 5 minutes before spreading so it doesn't melt the base underneath.

How to Make No Bake Peanut Butter Bars Step by Step
- Line a 9x13 inch baking dish with parchment paper, leaving some overhang on the sides for easy lifting. Set aside.
- In a large mixing bowl, combine the melted butter, peanut butter and vanilla extract. Stir together until smooth and fully combined.
- Add the powdered sugar and rolled oats to the peanut butter mixture. Mix well until a thick, uniform dough forms. It should hold together when pressed.
- Transfer the peanut butter mixture into the prepared baking dish. Using your hands or the back of a spoon, press it down firmly and evenly into one flat layer.
- In a microwave-safe bowl, combine the chocolate chips and coconut oil. Microwave in 30-second intervals, stirring between each, until completely melted and smooth about 60 to 90 seconds total.
- Pour the melted chocolate over the peanut butter layer and spread it evenly with a spatula.
- Refrigerate the dish for at least 2 hours, or until the chocolate is fully set and firm.
- Once set, lift the bars out using the parchment overhang. Place on a cutting board and slice into bars or squares. Serve cold or at room temperature.
Pro Tip: Always check for Halal certification on the packaging of chocolate or look at the manufacturer's website to confirm it is Halal.
Serving Suggestions
These bars are completely irresistible straight from the fridge, when the chocolate topping has that satisfying snap. I love serving them on a simple platter at the weekend family table alongside a pot of chai there is honestly no better combination. They're also perfect for:
- Eid dessert trays (they look beautiful when cut into neat squares)
- Packing in lunchboxes for school the next week
- Gifting to neighbors in a little box tied with ribbon
- Late-night cravings when everyone else is asleep (no judgment here!)
You can also dress them up with a sprinkle of flaky sea salt over the chocolate topping before it sets it elevates the flavor in the most wonderful way and makes them look extra fancy for guests.
For summer gatherings, I also love serving these bars alongside a slice of our refreshing No Bake Mango Cheesecake.
Storage Tips
| Storage Method | How to Store | Duration of Safe Storage | Note |
| Refrigerator | Store in an air tight container with parchment paper between each layer | Up to 1 week | You will notice flavors deepen after a day. |
| Freezer | Wrap individual bars in plastic wrap and then freeze them in ziplock bag | Up to 2 months | Thaw overnight in fridge or on counter for 15 minutes |
| Room Temperature | Airtight container | Up to 2 days | Only store in cool conditions. Chocolate melts in temperature above 24 degrees celcius |
Chocolate lovers should also try our rich Eggless Chocolate Brownie for another easy homemade dessert.
Frequently Asked Questions
Here are answers to the questions I hear most often about this recipe:
This can happen because of two reasons. A) You are using natural peanut butter that is too oily or B) You are not setting the bars for enough time needed.
Make sure you are using conventional creamy peanut butter and refrigerating for the full 2 hours. If the base still feels too soft after mixing, add 2–3 extra tablespoons of powdered sugar before pressing into the pan.
You can, but results will vary. Natural peanut butter has a higher oil content and less stable texture than conventional brands, which can make the base oily or prevent it from setting firmly. If using natural peanut butter, stir it extremely well first to incorporate the separated oil, and add an extra 2 tablespoons of powdered sugar to compensate for the extra moisture.
Replace the oats with an equal amount of crushed graham crackers or vanilla wafer crumbs. Graham crackers create a slightly crispier, more cookie-like base with a gentle sweetness that pairs beautifully with the chocolate topping. This is actually a popular variation and produces equally delicious results.
Your knife under hot water and dry it before each cut. The warm blade melts through the chocolate layer cleanly rather than cracking it. Use one smooth, downward press per cut rather than a sawing motion.
Absolutely and freezing is one of the best storage strategies for this recipe. Wrap individual bars in plastic wrap and place them in a freezer-safe bag for up to 2 months.
For thicker, more substantial bars, use an 8x8 or 9x9 inch square pan instead of a 9x13 inch pan.


Leave a Reply